Saturday 31 October 2015

The Ornate Horned Frog

http://www.skyhdwallpaper.com/wp-content/uploads/2014/11/ornate-horned-frog.jpg


http://f.tqn.com/y/exoticpets/1/W/Y/S/1/AC3272-001.jpg
Characteristics 
  • The Ornate Horned Frog are quite large and very colourful - They tend to be green with dark red to black markings along their backs. 
  • Females are slightly larger than males and may weigh up to one pound - They measure about 5.5 inches (14 cm) from snout to vent. 
  • They have vomerine teeth (teeth on the roof of the mouth), as well as the outside of the jaw. 
  • Horned frogs are large bodied frogs that are so called because of their fleshy horn-like upper lids above their eyes. 
  • They have large mouths that seem too large for their bodies in comparison to their legs and front arms. 
  • Horned Frogs can live up to 10 years with appropriate care, but average at about 6-7 years generally.

Habitat 
  • Ornate Horned frogs can be found in Northern Argentina, Brazil and Uruguay.
  • They burrow into leafy muddy vegetation of the Tropical Forest floor.
  • They hibernate for up to six months in dry conditions while waiting for the rain.
Diet
  • They eat large insects.
  • Small Vertebrates - lizards, mice and other frogs.
  • They are passive hunters and wait for food to come near before attacking them.
Fact

In South America, where the Horned Frogs originate from, they are many myths and superstitions about the Horned Frog. The locals call them ‘Ezcuerzos’, meaning simply ‘toad’ in Spanish. Some myths are positive about these frogs, stating that they are protective spirits of the water, whilst some stories claim that these frogs are so ferocious that they will kill large livestock like cattle and horses by biting onto their lips and not letting go until the poor beast has died.

Resources Used:
  • http://www.theamphibian.co.uk/horned_frog_care_sheet.htm
  • http://nationalzoo.si.edu/animals/reptilesamphibians/facts/factsheets/ornatehornedfrog.cfm

Friday 30 October 2015

My Face Chart

So below is my Face Chart for my Human Frog Hybrid. I was inspired by a certain Species of Frog which is an Ornate Horned Frog. I loved the different colours of their skin I've looked at a lot of this type of frog and they tend to have the same pattern but are different colours. I'm going to create a prosthetic piece to block out the eyebrow but to also raise it to create the eye lid of a Frog. I want the skin to be very silky wet looking. I am still contemplating whether to create a some what bumpy texture as some of the frogs of this species don't have bumps over their bodies. 


https://upload.wikimedia.org/wikipedia/commons/3/3f/Argentine_
Horned_Frog_(Ceratophrys_ornata)1.JPG

Interesting types of Frogs

When I was researching different species of Frogs I came across I website that had a top 10 of the most Interesting looking Frogs. Here are a few that I thought looked the most different.

Vietnamese Mossy Frog

http://envirocivil.com/wp-content/uploads/2013/01/bhguh.jpeg

This type of Frog is found in the tropical forests and marshes of northern Vietnam. The name comes from their distinct form of camouflage which resembles moss and lichen. When predators approach, the frog hides by curling its legs inwards, so only the mossy body is visible. It has large pads on its feet to stick to trees and its diet consists entirely of insects. The frogs lay eggs on cave walls and the tadpoles fall into the water below, where they spend the rest of their lives. The Vietnamese Mossy frog is also a popular pet in Asia.

Turtle Frog

https://i.imgur.com/EgHpsOX.png

This type of Frog is found in semi-arid regions of Western Australia. It has a very unusual appearance, and looks like a shell-less turtle, with a round, pinky-brown colored body, a tiny head and stubby limbs. Their limbs are short and muscular, allowing them to dig through the sand and to break open termite mounds, which is the frog’s main food source.

The Turtle frog skips the tadpole stage and grows into a fully formed frog while inside its egg. For this reason, the eggs are the largest out of any other frog in Australia, measuring 5 to 7 millimeters in length.


Goliath Frog

http://one-org.s3.amazonaws.com/us/wp-content/uploads/2015/06/African-Goliath-Frog.jpg

The Goliath Frog is the largest frog on Earth. It can grow up to thirty-three centimeters in length and can weigh up to three kilograms. The giant African Bullfrog is only half the size of the Goliath frog.

The creature is native to west Africa. It eats crabs, small snakes and even other frogs. The Goliath frog makes no sound due to the lack of a vocal sac. It has huge, powerful legs that allow it to jump a great distance—up to three meters (10 feet). Unfortunately, like many other frog species, the Goliath frog is vulnerable to human activity such as hunting, deforestation and the pet trade. These factors have now made the frog an endangered species.


Purple Frog

http://40.media.tumblr.com/tumblr_m2ziabHLJl1r2ca1mo1_1280.png

Found in the mountains of southern India, the Purple frog is a unique species of frog and the only member of the Nasikabatrachidae family. It has smooth, purple skin and a large, round body with stumpy limbs. The head is small and it has a pig-like nose. The Purple frog spends most of its life underground and only leaves its tunnel for two weeks every year. This species has evolved independently for 130 million years and its closest living relatives are the Sooglossidae frogs of the Seychelles.

Resources Used:
  • http://listverse.com/2013/03/04/top-10-bizarre-frogs/

Thursday 29 October 2015

Anatomy of a Frog and Similarities to the Human Body


Amphibians have very simple skeletons and have less bones than other vertebrates, The skeleton and anatomy of a frog is similar to the human body. Frogs and Humans have the same kinds of organs and systems of organs. The frog's anatomy, however, is much simpler.

Man's internal organs are protected in the chest, the abdomen, and the pelvis. The human chest is separated from the abdomen by a powerful muscular partition, the diaphragm .There is no such partition in the frog's coelom. All the frog's internal organs including the heart, the lungs, and all organs of digestion are held in this single hollow space.


http://nbcsscience.weebly.com/uploads/2/6/1/6/26165844/3412046_orig.jpg


The frog's body is supported and protected by a bony framework called the skeleton 
The skull is flat, except for an expanded area that encases the small brain. Only nine vertebrae make up the frog's backbone, or vertebral column. The human backbone has 24 vertebrae. The frog has no ribs.
The shoulders and front legs of the frog are somewhat similar to man's shoulders and arms. The frog has one "forearm" bone, the radio-ulna. Man has two forearm bones, the radius and the ulna. Both frog and man have one "upper arm" bone, the humerus.


http://www.biographixmedia.com/biology/frog-anatomy.jpg


http://www.infovisual.info/02/img_en/030%20Mouth%20of%20a%20frog.jpg

The flat head contains the brain, mouth, eyes, ears, and nose. A short, almost rigid neck permits only limited head movement. The stubby trunk forms walls for a single body cavity, the coelom.

Sources Used:
  • http://www.lookd.com/frogs/anatomy.html

Wednesday 28 October 2015

Amphibian's

What is an Amphibian ?

Amphibians are divided into four Groups :

  • Frogs and Toads
  • Newts
  • Salamanders
  • Sirens

Facts about Amphibians 

Amphibians are vertebrates that means they have a backbone. They are cold Blooded which means that they're body temperature changes depending on they're surrounding.
Amphibians have a naked skin meaning they don't have feathers, hair or scales. Also they can breathe through their skin. 

An Amphibians is very special especially Frogs and Toads as said before they use it to breathe, lose or take up water and produce colour patterns or markings for defence. They also secrete mucus from their skin to keep it moist and to prevent damage. 

Frogs are known for their jumping abilities, croaking, slimy skin and bulging Eyes. Frogs are all over the world and there are more than 6,000 species. 


http://vignette3.wikia.nocookie.net/animalcrossing/images/0/05/Frog-1
.jpg/revision/latest?cb=20130606165817


Sources Used
  • http://www.livescience.com/50692-frog-facts.html

Tuesday 27 October 2015

Diagram of Ideas for Human Hybrid


This is a diagram I created when I was trying to figure out how I want my human hybrid to be presented. It is a very simple diagram but it has helped to clear my mind and get my ideas onto paper.
While I was creating this diagram I had a book out with different species of frogs to get my creativity flowing. I knew from this diagram that I want to focus a lot on colour as this is a very specific element of any type of frog.

My Idea for my Human Hybrid

I found myself very confused at first to what was a Human hybrid at what we actually had to create. So when our lecturer was explaining exactly what we had to design and create. My idea popped into my head, I wanted to make a Human slash Frog I have no idea why I wanted to use a frog but if I think about it really hard I've always been interested by Frogs.


http://www.amnh.org/var/ezflow_site/storage/images/media/amnh/images
/frog/311113-1-eng-US/frog_dynamic_lead_slide.jpg


http://www.onekind.org/uploads/a-z/az_red_eye_tree_frog.jpg


I decided to see what Google had in terms of images of a Human mixed with a Frog, I found this particular image which I thought was very interesting. As you can see that all that the legs are the biggest element of a Frog. You could also say that the skin's smoothest reflects the silkiness of a frog's skin too. When I looked again at this image it really reminded me of a frog anyway without looking at the legs as that is a big give away, but I mean in terms of his shape and size it reminds me of a frog (obviously a larger frog)


http://scaredyet.net/wp-content/uploads/2014/10/2_hybrid_human_frog_sculpture.jpg

Monday 26 October 2015

Brave New World - Human Hybrid

So when I typed in Human Hybrid into Google this image appeared

https://s-media-cache-ak0.pinimg.com/736x/76/2c/1e/762c1e19116e35bc638db3203e0b2349.jpg


This above is a Woman slash some kind of Lizard, well that is what I think. You can see the key elements that make you think of Lizard is the skin texture - it looks like scales. Also her Face is very Lizard like, she doesn't have a nose and again she has scales all over her face. More apparent is the spikes sticking out her back. However what makes her human is her body shape and also her hair.

When I was looking for images of other Human Hybrids I tried thinking about films I'd watched that had Characters that were Human Hybrids.

Lord Voldemort - Human/Snake Hybrid

Voldemort is Half Snake and Human. As you can see there are subtle elements that make Lord Voldemort half snake, for example he doesn't have a nose, they had to create this in special effects after as there was no way of flattening the nose. His tongue if you look at the third image down his tongue is the same as a snakes.


http://static.comicvine.com/uploads/original/6/61417/1160857-voldemort.jpg


https://i.ytimg.com/vi/vW5hAc53Ry8/maxresdefault.jpg


http://3.bp.blogspot.com/_s-2Vvxblgd8/TNpP3AFoqrI/AAAAAAAAANE/HNJDSjiyS
4g/s1600/Harry-Potter-Voldemort_l.jpg


The Making of Voldemort 


http://prostheticmakeupfx.com/category/behind-the-scenes/lord-
voldemort-make-up-behind-the-scenes/
http://prostheticmakeupfx.com/category/behind-the-scenes/lord-
voldemort-make-up-behind-the-scenes/
https://prostheticmakeupfx.files.wordpress.com/2014/01/voldemort-make-
up.jpg?w=289&h=386&crop=1

The dotes on his face helped to digitally flatten his 
nose and create the slits without Prosthetic's.


When they were creating the Make up and SFX for Lord Voldemort originally his character had Red eyes however they decided later on that this would take away the expression from his eyes. Costume designer Jany Temime made his costume very light and slight skin like, she created lots layers of silk that helped to make the cloak look like it was floating (made him seem like a spirit) When it came to nose part which made the whole character look part snake part human they weren't able to do it with Prosthetic so they ended up doing it digitally. They digitally flattened his nose in order to replicate the look of a snakes nose and created slits on either side of his nose. They covered him in tattoo transfers to create the look of veins all over his body and head. Ralph Fiennes didn't want to be covered in makeup as he wanted to feel free, he had some prosthetic's above the eyebrows to block them out. He shaved off his hair completely in order not to wear a bald cap

Real Hybrid Animals

Ligers


https://s-media-cache-ak0.pinimg.com/736x/2a/e2/5c/2ae25c84bb2dd91d16d6c3c076c7d361.jpg
Ligers are a cross of a male lion and a female tiger, and they are the largest of all living cats and felines. Their massive size may be a result of imprinted genes which are not fully expressed in their parents, but are left unchecked when the two different species mate. Some female ligers can grow to 10 feet in length and weigh more than 700 pounds. Ligers are distinct from tigons, which come from a female lion and male tiger. 

Zebroids

http://www.curiosityaroused.com/wp-content/uploads/Zebroids.jpg
A zebroid is the offspring of a cross between a zebra and any other equine, usually a horse or a donkey. There are zorses, zonkeys, zonies and a host of other combinations. Zebroids are an interesting example of hybrids bred from species that have a radically different number of chromosomes. For instance, horses have 64 chromosomes and zebra have between 32 and 44


Wholphins

http://www.animalsdo.com/wp-content/uploads/2014/09/wholphin.jpg

A cross between a false killer whale and an Atlantic bottlenose dolphin, wholphins are hybrids that have been reported to exist in the wild. There are currently two in captivity, both at Sea Life Park in Hawaii. The wholphin's size, color and shape are intermediate between the parent species. Even their number of teeth is mixed; a bottlenose has 88 teeth, a false killer whale has 44 teeth, and a wholphin has 66.

Camas

http://media.mnn.com/assets/images/2010/04/cama.jpg.638x0_q80_crop-smart.jpg

A cama is a hybrid of two animals from different worlds — camels from Asia, and llamas from South America. The two species exhibit many differences, but camels and llamas are both camelids descended from a common ancestor that evolved in North America during the Palaeogene period. Camas were produced via artificial insemination to create an animal with the size and strength of the camel, but the more cooperative temperament of the llama

Resoures Used:
  • http://www.rantpets.com/2015/06/03/15-strangest-hybrid-animal-breeds-you-didnt-know-existed/

Thursday 22 October 2015

#Evaluation of Character's Wound

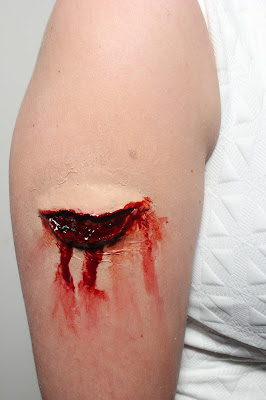
Overall I'm happy with the final outcome however I think there are areas for improvement. I feel like the wound looks slightly realistic I think what would have made the difference was the blood placement. I'm pretty pleased with the edges of the wound as I feel they blend it quite well there are areas for example the top part of it could have been blended a bit more, also talking about the top part of the wound I think I could have add some more colour there maybe some smudged blood, I just think it looks very empty which makes it look unrealistic as a cut as deep as that would not be neat. Also the dripping blood could be improved as I my head I wanted it to look stained all down the arm, I had to clean the blood off a couple of times as I wasn't happy with it but I still don't have it how I in-visioned it. If I could re do the blood I'd have it dripping down the entire arm and I would have used a brighter more loose blood as that would have helped to create that. I'm not happy with the colour of the actually wound as I think it looked to dark which was due to me painting it too dark. As I've mentioned before that you can see a lot of the ridges/creases from my difficulty of placing the wound on the arm when I'd applied the Pros-aide which I think slightly ruined the realism, however I think I did my best at removing the majority of it. This project has taught my a lot of things one being to be patient and that it's ok not to get it right on the first try, in all honesty I'm glad I had to start some areas of the process again as it really helped to remember the measurements and also what not to do.

The Final Images

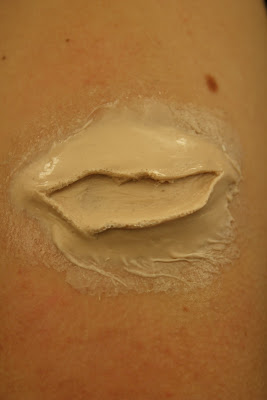
Wound Without any Colour 


Wound with Detail and Colour 


Wednesday 21 October 2015

Creating The Character - The Wound


  • Start by coating the back of your wound with Pros-aide and also the area in which your going to place the wound on your model's body.
  • You will need to wait until the Pros-aide goes clear before you can apply.
  • Once both areas with the glue are clear carefully place the wound onto the area on the model - be careful that the thin edges don't begin to stick together and fold.
  • Once you've got the wound on the model, begin smoothing out the edges and the excess with a cotton bud or cotton pad dipped into alcohol - this is going to take time so be patient.

I found this very difficult as my edges began folding and sticking together which meant it was difficult to undo it. I you look closely at the image to the right, you can see a lot of creases and this was due to the Pros-aide. This caused problems during the next stage as the ridges wouldn't come out.

This process was so long winded and took quite a bit of time as I wanted the edges to be invisible. If you look below you can see that I you can still see creases, these ridges were due to the pros-aide being extremely sticky which meant the thin Super Baldiez folded. I found it extremely annoying removing all the edges but in all honestly I don't think I could have done anything more to the wound in terms of smoothing it out. 
The first image below it after I'd applied some alcohol activating colour to it, I was pretty happy with how this looked. I could have made it slightly darker looking at it again.


Once I'd applied and smoothed out all the edges as best as I could, I applied some colour inside my wound I had an image of a real glass wound as reference to the colour. I used just a bruise wheel which had red's, black's and brown creme colours. I used a small detail brush to get into all the hard to reach areas. Looking back I wished I had made the red a little brighter as I wanted it to look fresh. 
I then went onto adding congealed blood in some of the dark areas to create depth. Once I was happy with this I decided to add the blood, I used quite a lot and tried to make it look like it was dripping from the wound.

I found making the wound look realistic very difficult, looking back I wish I'd made the red colour inside the wound a bright red as the image I was referencing the blood looked a lot brighter. I'm glad I added the congealed blood as it made it look slightly deeper and as if some of the blood was drying up. I don't think I am extremely happy with the blood as I think I used a blood colour that looked too dark and I found it extremely difficult to get the blood to drip so I was there for a while using a cotton bud from different angles trying to get the blood to drip which it did after a while but I wasn't 100% in love with it. 


Tuesday 20 October 2015

Types of Lacerations

Laceration is a disruption of the continuity of tissue caused by a blunt force. The full thickness of the skin, subcutaneous tissues, muscle and/or the internal organs can get involve.

Split Lacerations
  • This is caused by compression of the skin between the weapon and bone.
  • For example a blow with a heavy blunt weapon on the head, face, elbow, shin or hip.

Torn Lacerations
  • This is caused by a projecting surface of an object being dragged over the skin.
  • For example Road traffic accidents or machinery accidents.

Stretch Lacerations
  • This can be caused by a heavy blunt impact on an area causing the skin to over stretch
  • For example Machinery accidents.

Perforated Lacerations
  • This can be caused by objects capable of penetrating the skin
  • For example a gun or an explosion
Blast Lacerations
  • This can be caused by local blast effect of expanding gases
  • For example Blast injuries

Cut Lacerations
  • This can be caused by blunt sharp weapons
  • For example a knife or blade

Crush Lacerations 
  • This is a result of bone protruding out of the skin
  • For example injury to the head or an arm/leg

Resources Used:
  • http://webcache.googleusercontent.com/search?q=cache:http://www.pdn.ac.lk/med/departments/forensic/BUDHUSARANAI/forns-scn-cont.html&strip=1&vwsrc=0

Monday 19 October 2015

Looking at Real Lacerations to the Arm

 photo kneepic.jpg
This laceration is at the top of the arm I belief, it looks quite deep you can see this as there are dark areas. It looks like it has split the skin open and teared the tissue underneath. They probably was a lot of blood but this has been cleaned up.


https://c2.staticflickr.com/4/3311/3247883776_fbe95290ef.jpg
So you can straight away that this lacerations look like it hurts. As you can see a large chunk of skin has been teared away from the arm. If you look closely you can see the muscles inside the arm. You can tell from the bandage that there was a lot of blood and that would be expected from the size of the laceration. 

Removing the Wound from the Silicone Mould

In order to Remove the Wound from the Silicone Mould you need to be very careful and patient. Here is a simple step by step:

  1. First brush over a large amount of Baby Powder all over the piece - this will remove the stickiness.
  2. Using a small paint brush start by pushing up the edges very gently - the Super Baldiez should begin to lift.
  3. Continue this process with a small amount of Baby powder on your paint brush until all the edges have lifted and wound is detached. 


#Reflection: Making the Wound from the Mould (Error)

Due to not knowing how to remove the wound properly I broke the edges of the Super Baldiez which is essential part to smoothing out the edges and making it look realistic when it came to applying to the model.

So after I'd made my mixture for the actual Wound to be created from the Silicone Mould, I knew as soon as I left my lesson that there was a problem with how it looked. Unfortunately I didn't take a Picture but my mixture had a lot of air bubbles settling on top of it, I knew it hadn't set properly. So a couple of days after letting my wound dry I decided to bite the bullet and remove the wound from the mould (note that we'd been told not to as we were going to be shown how to remove them properly) Anyway I wanted to get the disappointment out of the way so I preceded to take it out and the image above is what I was left with. I knew straight away that it wasn't meant to look like this. When I went into class that Monday I showed my lecturer and she suggested that I started again. The positive thing from this experience was that the ingredients and measurements embedded themselves in my mind. So while my classmates removed their wounds I got my mixture ready and my cleaned my silicone piece ready.

As you can see from the Image above this was how my first wound was meant to come out, if you look closely the edges aren't broken too much. I also powdered the piece when it was still on the silicone mould, this helped when it came to removing it.
Overall I'm really happy with my second attempt and if I think about it, it worked out for the best as I got to go over the ingredients and measurements again which helped with memorizing them. I was really happy with the colour as well and the piece looks very smooth.

Friday 16 October 2015

Face Chart


I want my Model to have Mascara stained tears down her face, as she has been crying from the scary event of her boyfriend's jealous ex girlfriend's attacking her. I also want her lipstick to be smudged as she was wiping away her tears. In general her make up will be messy as she doesn't care after the attack. Her messy make up will show her vulnerability. 

via ffffound:
https://uk.pinterest.com/pin/262334747014887090/


beautiful tears and fragility | black & white photography | sad | smokey eyes | running mascara | emotion | feel | process | hope | faith | everything will be okay | reach out | ask for help | feel your sadness and let it go | vulnerability | www.republicofyou.com.au:
https://uk.pinterest.com/pin/207165651582760240/

Wednesday 14 October 2015

Health and Safety

Always follow these points when using and experimenting with SFX Make up:

  • When using Silicone A and silicone B pay special attention not to contaminate.
  • Use different latex gloves when using each product - to prevent contamination.
  • Use different sticks when scooping out Silicone A and Silicone B.
  • Avoid products with Aloe Vera.
  • Always use an even amount of products A and B when mixing them together to get the right consistency.
  • Always make sure you mould is completely clean and dry before using.
  • Always spray the setting spray by an open window and 20 cm away.
  • Make sure your kit is always clean so that the products can be used over and over again.
  • Always make sure all the products are stored correctly, i.e. in a cool place, with the bottles upright and with lids on.
  • Make sure you powder the latex well so that they don't stick together.
  • Wear clothes that you don't mind getting ruined because latex  and Silicone will not come out of clothing.
  • Hair must always be tied up to avoid mixtures ruining and don't wear any Jewellery.


Monday 12 October 2015

Creating My Glass Shard Wound

 Equipment Required:
  • Sticks/Lollipop sticks (2 Labelled A and 2 Labelled B)
  • Black Gloves
  • Glue gun
  • Face Mask
  • Clay sculpture on some plastic
  • Measuring cups
  • Scissors
  • Fixing spray
  • Petrolease
  • Silicone A and Silicone B
  • Scales
  • Cling film
  • Baby wipes
  • Tissues
  • Isopropyl alcohol
  • Super Baldiez
  • Hair dryer
  • Paint Brush
  • Deadener
  • Silicone pigments
  • Metal plate
  • Naphtha
  • Cotton Buds

Step By Step:
  • Firstly start by labeling 2 sticks A and another 2 B
  • Apply a large piece of Cling Film to your surface - in order not the damage the surfaces and also it makes it easier to clean after
  • Have your Black Latex free gloves on hand 
  • Make sure your Glue Gun is hot and ready to use.
  • Cut 1 of our Measuring Cups in half using the scissors
  • Have your clay sculpture on the plastic tray ready.
  • Before Glue gunning the plastic cup to the plastic - spray the Fixing Spray 20cm away from your Clay sculpture (Make sure to do it next a window and to be wearing your face mask)
  • Once the Fixing Spray is dry then spray Clay sculpture with Petrolease again 20cm away
  • Once your measuring cup is cut in half, place on top of your Clay sculpture - it should fit nicely inside the measuring cup.
  • Using your Hot Glue Gun, begin securing your cup to the plastic - make sure there are no air bubbles and no gaps.


Making the Silicone:
  • Using a clean Measuring cup place on the measuring scales and set to 0 - then with clean black gloves start measuring 30 grams of Silicone A using the stick labeled A (Take time with this as it need to be accurate)
  • Do the same with Silicone B - make sure to wear new black gloves to prevent contamination.
  • After using each Silicone pot make sure to clean down with a baby wipe - again to prevent contamination.
  • Once you have both measurements in the same cup mix together well - bang on a hard surface to remove any air bubbles.
  • Once happy with consistency pour evenly on to Clap sculpture - the plastic cup will give the silicone the shape after it's finished.
  • You will need to wait a good hour for the silicone to set.
  • Once the silicone is dry peel out carefully out of the plastic.
  • Wipe the silicone with some isopropyl alcohol and use a cotton bud to get in all the hard to reach areas - make sure there is no Clay residue. 


Creating the Wound Using the silicone Mould:
  • Spray the silicone with Petrolease from a distance of 20 cm until dry.
  • Now create a mixture of 1 part Super Baldiez and 2 part ispropyl alcohol and mix well.
  • Pour this mixture onto your silicone piece spread this out evenly with a paint brush - make sure to blend the edges (if you have any leftover of the mixture place a glove over the measuring cup this will prevent the mixture from drying up)
  • Apply a second coat - you can use a hair dryer to speed up the process (make sure its on a cool setting)
  • Apply clean black gloves get out a new measuring cup and add 8 grams of silicone A using a stick labelled A.
  • Do the same with silicone B - make sure to clean down each pot and to apple clean gloves to prevent contamination. 
  • Now with a new stick and clean black gloves add 12 grams of deaderner to the mixture - this will make the silicone softer and more skin like.
  • Add 1 to 2 drops of pigment to the mixture - try using shades that are close to your model's skin tone.
  • With the mix mixture pour on to your silicone mould - using something flat get rid of any excess mixture.
  • Using Naphtha on a cotton bud to wipe any more excess and to blend the edges.
  • Leave to set for an hour and then apply powder to avoid sticking.

Self Reflection

I really enjoyed this lesson, it was difficult and you really needed to listen in order not to make an error. I came across some hurdles for example when I was applying the silicone on top of my clay sculpture I didn't realize that I needed to use 10 grams more of Silicone A and silicone B due to the fact that my clay piece was high - so when I took the silicone of the clay piece I had a hole in the bottom. This meant I had to start again (very annoying and stressful) However looking on the bright side it helped me take the measurements in easier, so when it came to doing it again I was a lot faster at getting the measurements. When I had waited an hour (again) for my silicone to set, it was perfect however pretty much everyone had gone onto making the actual wound. At this point I was feeling the heat, however I chilled out and got on with it. I found it difficult getting the super baldiez to stay and my friend's leftover mixture had dried up. When it came to putting the mixture for the actual wound my other friend had made to much which was very helpful because it was coming to the end of the class, when I eventually got the mixture on the silicone, I don't it settled well as I've noticed lots bubbles which worries me as we are doing our shoots next week. However hopefully I'll have some time to restart mine.